How to follow an effective water analysis workflow 2026
Do you have your own well and wonder how to ensure the water is truly safe to drink? Many well owners believe that clear water is automatically clean water, but 20% of private wells in Sweden have unsafe water with no visible signs. Regular water analysis is your only guarantee to protect your family's health and avoid costly problems with pipes and appliances. This article guides you through each step of an effective water analysis workflow, from preparation to interpretation and improvement measures.
Table of Contents
- Key Points
- Preparations for Your Water Analysis
- Perform the Water Analysis Step-by-Step
- Interpret Your Analysis Results and Common Problems
- Measures to Improve and Ensure Water Quality
- Ensure Your Well's Water Quality with Svenskt Vattenprov
- Frequently Asked Questions about Water Analysis Workflow
Key Insights
| Point | Details |
|---|---|
| Regular testing every three years | The Public Health Agency of Sweden recommends regular testing every three years and more often for at-risk groups. |
| Swedac accredited laboratory | Order and use sampling kits from a Swedac accredited laboratory. |
| Sampling before purification equipment | Take samples from the cold water tap before any purification or filters so that the results reflect the well water. |
| Interpretation according to National Food Agency standards | Compare results according to the National Food Agency's standards and prioritize health risks first. |
| Measures and new sampling | In case of detected contamination, filtration and disinfection are carried out, followed by new sampling to confirm safe water. |
Preparations for Your Water Analysis
A successful analysis result begins long before you open the tap. Preparations determine whether your sample will be representative and whether the results are legally sound. Many well owners make the mistake of using any bottle or waiting too long to send the sample, which can lead to misleading results.
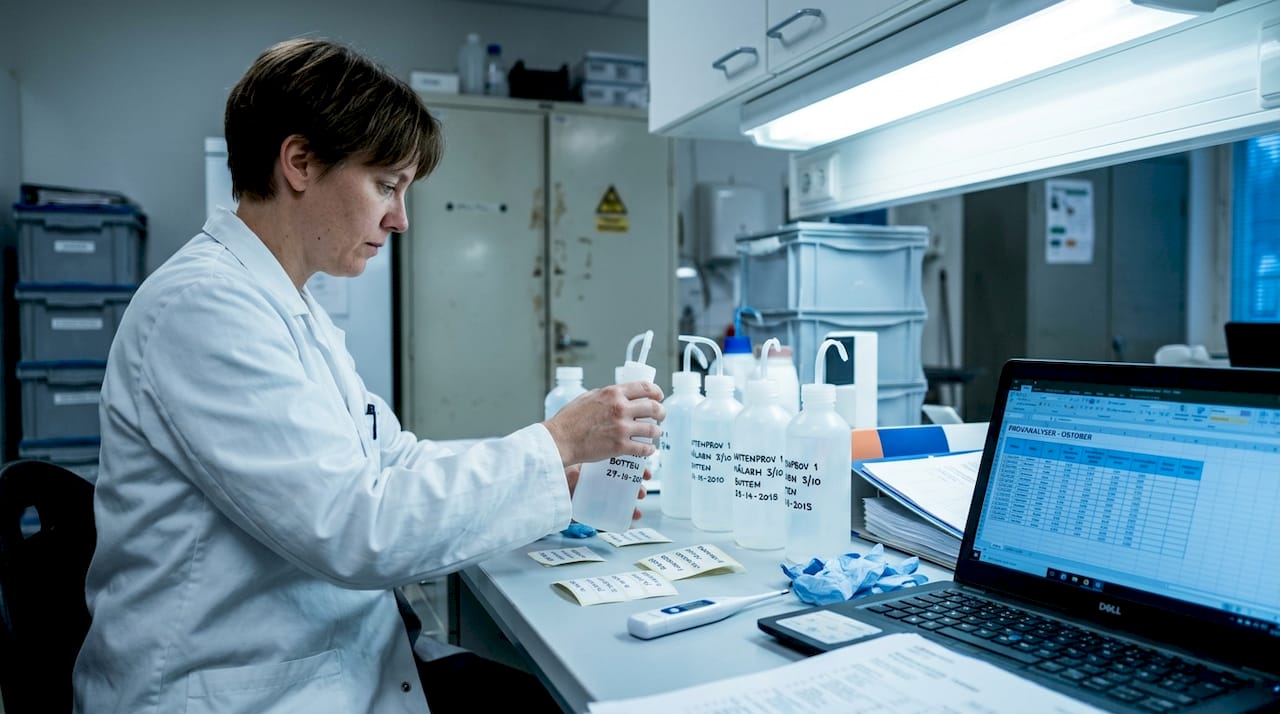
Always order your sampling kit from a Swedac-accredited laboratory like SGS Analytics. These kits contain sterile bottles and clear instructions adapted to Swedish conditions. Sampling must take place from the cold water tap before any filters or purification equipment; otherwise, you'll be testing the filter's performance instead of the well's actual quality. Sterility is crucial for bacterial analysis; a single contamination during sampling can give a false positive result.
Understand which parameters are included in your chosen analysis package. Basic packages typically cover 30-40 parameters, including E.coli, coliform bacteria, nitrate, nitrite, pH, hardness, iron, manganese, and arsenic. More comprehensive packages analyze up to 70 parameters and include heavy metals, PFAS, and radon. Choose a package based on your well type and local risk factors.
Checklist for sampling day:
- Check that bottles are sterile and sealed
- Identify the correct tap (cold water, before filter)
- Have labels and registration forms ready
- Plan for immediate shipment on the same day
- Document date, time, and any observations
Pro tip: Always take samples in the morning when the water has been stagnant overnight. This provides a more representative picture of any metal leaching from pipes and the well's actual quality. Avoid sampling immediately after heavy rain, as surface water may have temporarily seeped in.
The following table shows which analysis packages are suitable for different well situations:
| Well Type | Recommended Package | Important Parameters | Cost |
|---|---|---|---|
| Drilled bedrock well | Water Analysis Drilled Well | Bacteria, arsenic, radon, metals | 1500-2000 SEK |
| Dug well | Water Analysis Dug Well | Bacteria, nitrate, surface water indicators | 1200-1800 SEK |
| Well near agriculture | Complete+ or special analysis | Nitrate, pesticides, bacteria | 2500-4000 SEK |
| Well in granite area | Addition of radon analysis | Radon, uranium, fluoride | +800-1200 SEK |
By carefully following water sample instructions, you maximize the chance of getting reliable results the first time. This saves both time and money compared to having to resample. Once you have the materials ready, the next step is to carry out the sampling methodically.
Perform the Water Analysis Step-by-Step
Now that the preparations are complete, it's time for the actual sampling. The precision in this step determines whether your analysis results will be useful or not. Many well owners underestimate how sensitive the process is, especially when it comes to bacterial samples.
Step 1: Collect the water sample correctly
Open the cold water tap and let the water run for 2-3 minutes to flush out stagnant water from the pipes. This provides a sample that represents the well's quality, not the plumbing system's. Then reduce the flow to a thin stream. Open the sterile bottle just before sampling, avoiding touching the inside of the cap or bottleneck. Fill the bottle to the indicated level, usually 80-90% full to allow for expansion. Close immediately and label the bottle with the date, time, and sampling location.
Step 2: Package and ship the sample quickly
Bacterial samples must be analyzed within 24-48 hours for valid results. Pack the bottle in the provided packaging, fill out the registration form with all well details. Ship on the same day, preferably Monday to Thursday, to avoid the sample sitting over the weekend. Chemical analyses are less time-sensitive but should still be shipped within a few days.
Step 3: Understand what the lab analyzes
When your sample reaches the Swedac-accredited laboratory, it undergoes systematic testing of 30-70 parameters depending on the chosen package. Microbiological analyses identify E.coli and intestinal enterococci, indicating fecal contamination. Chemical analyses measure nitrate, nitrite, arsenic, lead, copper, iron, manganese, and other metals. Physical measurements include pH, conductivity, hardness, color, and odor. Advanced packages also test for PFAS, pesticides, and radioactive substances like radon.
The typical timeframe from submission to results is 7-14 business days. You will receive a digital report via email with all measured values, limit values according to the National Food Agency, and a summary assessment. Many laboratories also offer telephone consultations to help you interpret water analysis results.
Pro tip: Register your sample immediately after sampling via the laboratory's web portal or app. This speeds up the process and reduces the risk of delays. Save all receipts and registration numbers; these are needed if you apply for grants for water improvement measures or when selling property. Many municipalities require documentation from the past three years.
By following these steps methodically and adhering to the timeframes, you ensure that the analysis results are reliable. With the report in hand, the next critical step is to understand what the numbers actually mean for your and your family's health.
Interpret Your Analysis Results and Common Problems
When the analysis report lands in your inbox, you are faced with a series of numbers, chemical designations, and parameters that can seem overwhelming. The key is to systematically compare your values against official standards and prioritize correctly. Health risks should always be addressed before technical problems.
The National Food Agency classifies drinking water into three categories based on analysis results. Potable water meets all requirements and can be consumed without restrictions. Potable with remark contains deviations that do not pose an immediate health risk but should be addressed, for example, high iron or abnormal pH. Non-potable water violates limit values for hazardous substances and should not be used as drinking water without intervention.
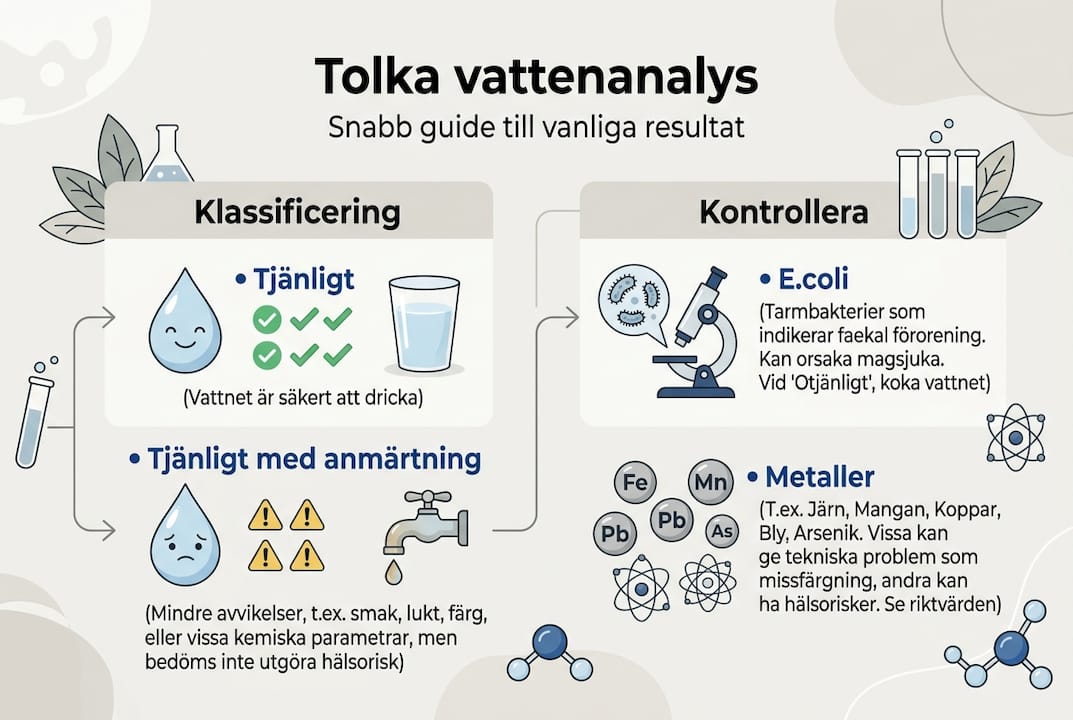
First, focus on microbiological parameters. The presence of E.coli or intestinal enterococci indicates fecal contamination and acute health risk. This requires immediate action through disinfection and follow-up sampling. Coliform bacteria without E.coli suggest general bacterial contamination, often from surface water or inadequate well sealing.
Chemical health risks include nitrate above 10 mg/l, which is particularly dangerous for infants and can cause blood oxygen deficiency. Arsenic, even in low concentrations, increases the risk of cancer with long-term exposure. Lead and copper can leach from old pipes and affect the nervous system, especially in children. High levels of fluoride damage teeth.
Common technical problems affecting comfort:
- Iron above 0.2 mg/l causes rust staining and metallic taste
- Manganese above 0.05 mg/l causes black stains on porcelain
- Low pH below 6.5 corrodes pipes and releases metals
- High pH above 9.5 gives a soapy taste and deposits
- High hardness above 250 mg/l CaCO3 creates limescale deposits
Approximately 20% of private wells are deemed non-potable in the first analysis. The most common problems are bacteria, elevated nitrate, and arsenic. Many well owners are surprised because the water looks clear and clean.
| Parameter | Limit Value | Health Effect if Exceeded | Action Priority |
|---|---|---|---|
| E.coli | 0 per 100 ml | Gastrointestinal illness, diarrhea, severe infections | Acute |
| Nitrate | 10 mg/l | Oxygen deficiency in infants, carcinogenic | High |
| Arsenic | 10 μg/l | Cancer, skin lesions, neurological damage | High |
| Lead | 10 μg/l | Developmental disorders in children, kidney damage | High |
| Iron | 200 μg/l | No health risk, taste and color problems | Low |
| pH | 6.5-9.5 | Corrosion of pipes, metal leaching | Medium |
“Many believe that clear water is safe water, but arsenic and nitrate are invisible, odorless, and tasteless. Only laboratory analysis reveals these hidden threats to health.” – Water expert at SGS Analytics
By understanding the difference between acute health risks and technical problems, you can prioritize appropriate measures. Feel free to use the National Food Agency's guidance to interpret important water parameters in your specific case. With clear interpretation, you can now proceed to concrete improvement measures.
Measures to Improve and Ensure Water Quality
Once you have identified problems in your water analysis, the next step is to choose the right actions. Each type of contamination requires specific solutions, and there is no universal method that solves everything. The correct choice depends on the nature of the problem, its extent, and your budget.
For bacterial problems, disinfection is the only solution. UV light is effective against all bacteria and viruses without adding chemicals to the water. The system is installed in the pipeline and requires annual replacement of the UV lamp. Chlorination is an alternative where sodium hypochlorite is automatically dosed but requires careful dosing and can give a chlorine taste. Ozone treatment is powerful but more expensive to install. Regardless of the method, you must always address the root cause, for example, sealing the well against surface water or repairing defective lids.
Metals such as arsenic, lead, and copper require filtration with special media. Reverse osmosis removes up to 99% of dissolved substances but wastes a lot of water and requires regular filter changes. Ion exchange filters are effective against specific metals and can be regenerated. Activated carbon removes organic pollutants and improves taste but is less effective against metals.
Nitrate problems require either reverse osmosis or ion exchangers. Alternatively, you can drill a new, deeper well if the nitrate level is due to shallow contamination from agriculture or sewage. This is often the most cost-effective long-term solution.
pH adjustment is done with dosing systems that add alkaline substances for low pH or acids for high pH. Limestone filters are a simple alternative to naturally raise low pH. The correct pH value protects your pipes and prevents metal leaching.
Comparison of common purification methods:
| Method | Effective Against | Installation | Operating Cost/Year | Pros and Cons |
|---|---|---|---|---|
| UV light | Bacteria, viruses | 8000-15000 SEK | 500-1000 SEK | Chemical-free, requires clear water |
| Reverse osmosis | Metals, nitrate, salt | 5000-12000 SEK | 1500-3000 SEK | Very effective, wastes water |
| Ion exchanger | Hardness, certain metals | 6000-18000 SEK | 1000-2000 SEK | Regenerable, requires salt |
| Activated carbon | Organic substances, taste | 3000-8000 SEK | 800-1500 SEK | Improves taste, limited against metals |
| Chlorination | Bacteria | 10000-20000 SEK | 1200-2000 SEK | Powerful, can cause odor/taste |
Pro tip: Always install purification equipment after the pressure tank but before the water heater. This protects both the purification system from pressure fluctuations and the water heater from contamination. Install a separate tap with untreated water for irrigation and washing, which saves filters and operating costs.
After installing purification equipment, follow-up sampling is crucial. Wait 2-4 weeks for the system to stabilize, then take a new sample to verify that the problem is solved. Many well owners make the mistake of assuming that the installation solved the problem without checking the result.
Regular maintenance is critical for continued function. Change filters according to the manufacturer's recommendations, check the UV lamp's effectiveness annually, clean and disinfect the system as needed. A well-maintained system can function for 10-15 years or longer.
Preventive measures reduce future problems. Check well lids and seals annually, keep the area around the well free from sources of contamination, avoid chemicals and fertilizers within 30 meters of the well. Document all measures and analyses; it facilitates future troubleshooting and increases property value.
Ensure Your Well's Water Quality with Svenskt Vattenprov
After learning the entire process from sampling to remediation, you surely realize the importance of working with reliable partners. Svenskt Vattenprov offers complete solutions adapted for Swedish well conditions, all analyzed by SGS Analytics, which is Swedac-accredited.
Choose from our specially adapted analysis packages for different well types. Water analysis for private wells covers basic parameters, while Water Analysis Complete+ with 71 parameters provides maximum security for those who want full control. Each kit contains sterile sampling bottles, clear instructions, and pre-paid return shipping.
Results are delivered digitally within 7-14 days with pedagogical explanations of each parameter. You receive concrete recommendations for necessary actions and can always contact our advisory service for personal guidance. We also help with well water registration with the municipality, which has been mandatory since 2020 and facilitates grant applications.
Frequently Asked Questions about Water Analysis Workflow
How often should I analyze my well water?
The Public Health Agency of Sweden recommends analysis every three years for normal wells. Test annually if you have infants, immunocompromised individuals in the household, or if the well is located near sources of contamination such as agriculture, industry, or roads. Analyze immediately if there are changes in taste, odor, color, or after flooding and construction work nearby.
What does a complete water analysis cost?
Basic analysis packages with 30-40 parameters cost 1200-2000 SEK. Comprehensive packages with 70+ parameters cost 2500-4000 SEK. Special analyses for PFAS, radon, or pesticides are an additional 800-2000 SEK per analysis. Invest in the right package from the start; it's cheaper than having to supplement later.
Can I drink the water while waiting for analysis results?
If the water looks clear, smells, and tastes normal, you can use it with some caution. Boil the water for 3 minutes before drinking if you are unsure; this kills bacteria but does not remove chemical contaminants. Avoid giving unboiled water to infants or immunocompromised individuals until the results show that the water is potable.
What are the most common measures after a water analysis?
UV disinfection is installed in about 40% of cases to handle bacterial problems. Iron and manganese filters are needed in about 30% of wells. pH adjustment is required in 20% of cases. Reverse osmosis or ion exchangers for nitrate and metals are installed in 15% of cases. Many wells require combinations of several systems.
How long does it take to remedy water problems?
Installation of UV light or filters typically takes 2-4 hours for an experienced installer. More extensive systems like reverse osmosis can take a full day. After installation, wait 2-4 weeks before follow-up sampling for the system to stabilize. The total process from analysis to verified results usually takes 6-10 weeks.
Do I need a building permit for a water purification plant?
No, the installation of indoor water purification equipment does not require a building permit or notification. However, electrical installations must be carried out by a qualified electrician in accordance with electrical installation regulations. For replacement or new drilling of a well, permission from the municipality's environmental office is required. Always contact the municipality before major interventions on the well itself.