Guide to brunn water checks for safe well water at home
If you own a private well in Sweden, the responsibility for ensuring your family drinks safe water rests entirely on your shoulders. Unlike municipal water supplies that undergo continuous monitoring, your brunn receives no government oversight. This guide walks you through the essential process of testing your well water, interpreting results, and taking action when problems arise so you can protect your household’s health with confidence.
Table of Contents
- Key takeaways
- Understanding your responsibilities and why testing matters
- Preparing for your brunn water test: what you need and when to test
- Executing the test: step-by-step water sampling and analysis process
- Interpreting results and next steps if water quality issues arise
- Ensure safe well water with trusted testing services
- FAQ
Key Takeaways
| Point | Details |
|---|---|
| Owner responsibility | Private well owners in Sweden are personally responsible for ensuring safe drinking water with no mandatory government testing. |
| Testing frequency | Test at least every three years for stable wells and annually if risk factors such as young children are present. |
| Accredited labs | Choose a Swedac accredited laboratory to ensure results are credible for health decisions and property transactions. |
| Contaminant scope | Test for microbiological, chemical, and physical contaminants to assess overall water quality. |
| Remediation and retest | If problems are detected, take remediation steps and retest to confirm water safety. |
Understanding your responsibilities and why testing matters
As a private well owner in Sweden, you occupy a unique position in the water safety landscape. Homeowners with private wells are personally responsible for ensuring drinking water safety, with no mandatory government testing applying to your supply. This stands in stark contrast to public water systems, where municipal authorities conduct continuous monitoring and treatment.
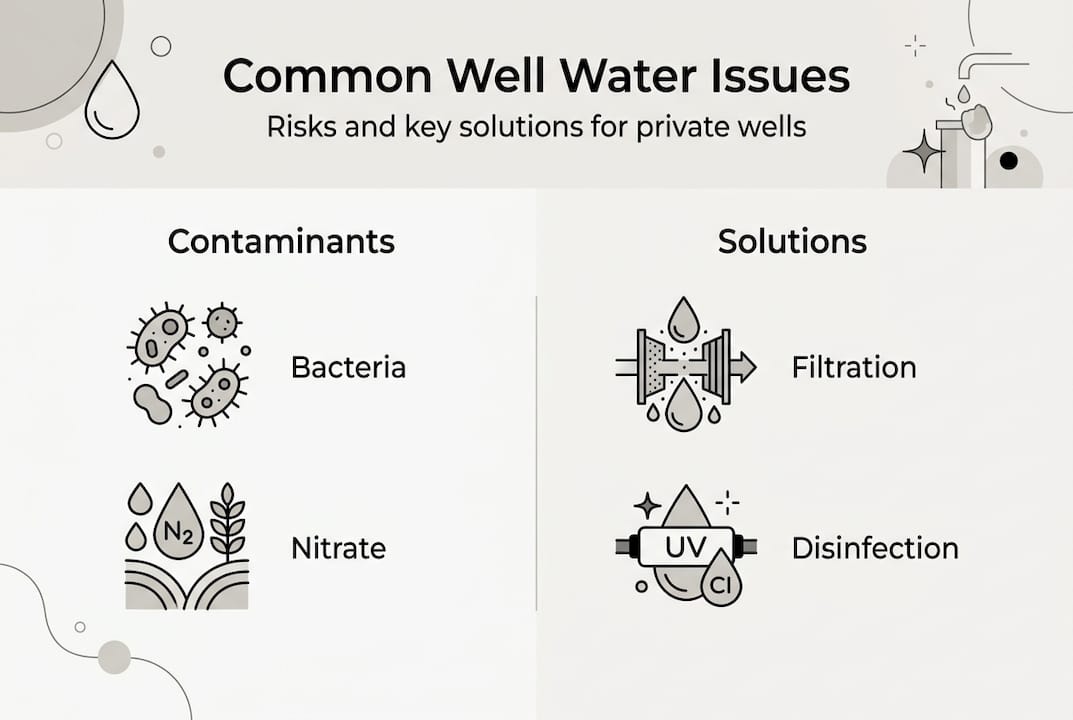
The health implications of this responsibility are substantial. Your well water can harbor invisible threats including E.coli bacteria, heavy metals like lead and arsenic, nitrates from agricultural runoff, naturally occurring radon gas, and persistent PFAS chemicals. Research shows approximately 20% of private wells in Sweden contain water unfit for drinking without treatment. That’s one in five households potentially exposing their families to contaminated water.
Swedish authorities including Livsmedelsverket strongly recommend regular water testing for private wells even though no legal mandate exists. This recommendation framework includes:
- Testing at minimum every three years for established wells in stable conditions
- Annual testing for households with children under five years old
- Immediate testing after flooding, nearby construction, or changes in water appearance
- Mandatory testing when selling property with a private well
The absence of regulation means you must become your own water quality manager. You need to understand what contaminants threaten your specific region, recognize warning signs of contamination, and know how to respond when test results reveal problems. Many homeowners discover issues only after family members experience unexplained illness, making proactive testing essential rather than optional.
“Water quality in private wells can change dramatically over time due to seasonal variations, nearby land use changes, or deteriorating well construction. What tested safe five years ago may pose serious health risks today.”
Your well’s vulnerability depends heavily on its construction type and local geology. Drilled wells penetrating bedrock generally offer better protection against surface contamination than shallow dug wells. However, bedrock wells in granite regions face higher radon risks, while wells in agricultural areas commonly show elevated nitrate levels. Understanding these regional patterns helps you prioritize which contaminants deserve closest attention during testing.
Preparing for your brunn water test: what you need and when to test
Successful water testing begins long before you collect your sample. The preparation phase determines whether your results accurately reflect your water quality or simply measure contamination introduced during careless sampling.
Start by selecting a Swedac-accredited laboratory. Only these facilities provide results that Swedish authorities and potential property buyers will accept as legally valid. The accreditation ensures the lab follows Livsmedelsverket guidelines and EU standards for drinking water analysis. Attempting to save money with non-accredited testing wastes your investment when you need credible results for health decisions or property transactions.
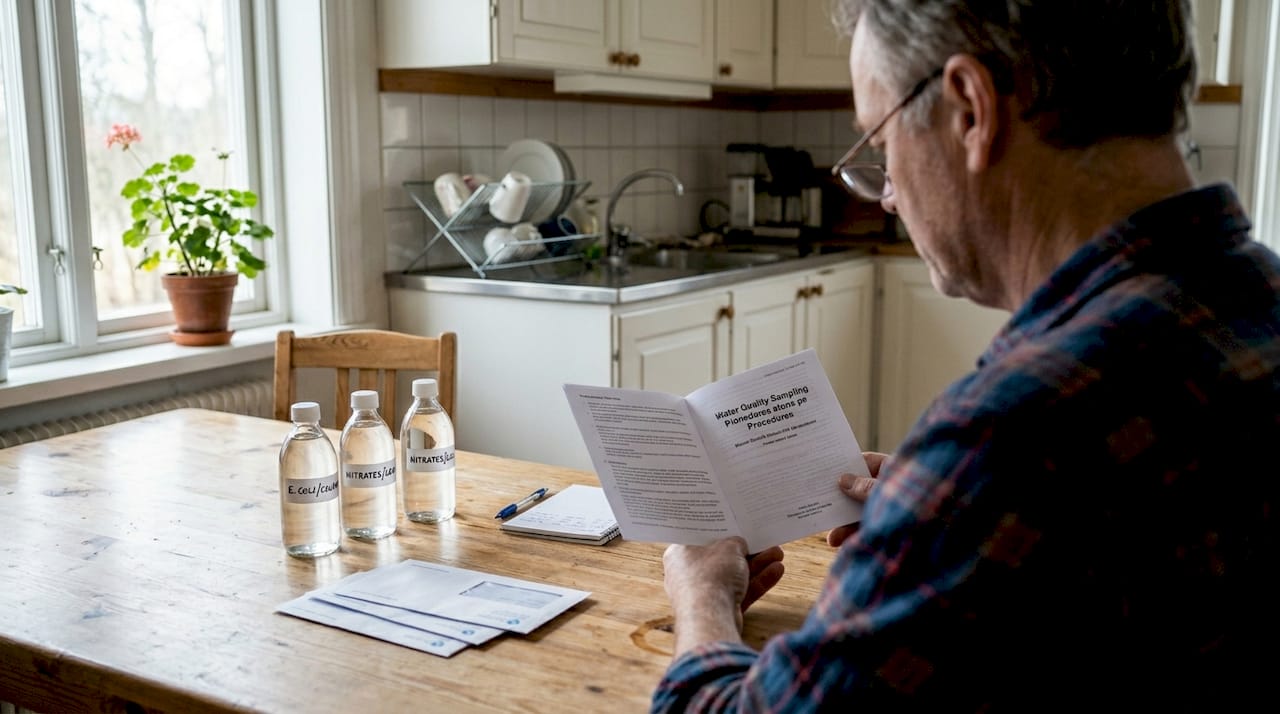
Your chosen lab will provide sterile sampling bottles specifically designed to prevent contamination during collection and transport. Never reuse bottles or substitute containers from your kitchen. The sterility of these bottles is critical for accurate bacterial testing. Most labs also include detailed brunn water sampling instructions with your test kit.
Timing your test correctly matters more than many homeowners realize. Recommended testing frequency is every 3 years normally, with annual testing for risk groups like families with young children or after events like flooding. However, your specific situation may demand more frequent monitoring:
| Household Situation | Recommended Testing Frequency | Reason |
|---|---|---|
| Standard household, established well | Every 3 years | Baseline monitoring for gradual changes |
| Children under 5 or pregnant women | Annually | Higher vulnerability to contaminants |
| New well (less than 1 year old) | Every 6 months for first 2 years | Establishing baseline and detecting early problems |
| After flooding or heavy rain events | Immediately | Risk of surface water infiltration |
| Nearby construction or land use changes | Within 3 months of change | Potential groundwater impact |
| Before property sale | Within 6 months of listing | Legal and practical requirement |
Pro Tip: Schedule your water test for a period when your household has been using water normally for at least a week. Avoid testing immediately after vacation when water has sat stagnant in pipes, as this can produce misleadingly poor results that don’t reflect your typical water quality.
Gather the materials you’ll need before beginning sample collection. Beyond the sterile bottles from your lab, you’ll want disposable gloves to prevent hand bacteria from contaminating samples, and a cooler with ice packs if you can’t deliver samples to the lab within a few hours. Most laboratories require sample delivery within 24 hours of collection for bacterial testing, though chemical analysis samples often have longer windows.
Understand which test package suits your needs. Basic bacterial screening costs less but misses chemical contaminants. Comprehensive packages testing 40+ parameters provide thorough assessment but represent a larger investment. Consider your well type, regional risks, and whether you’ve tested before when choosing your analysis level. First-time testing generally warrants comprehensive analysis to establish your baseline water quality profile. For detailed guidance on selecting appropriate tests, review how to test brunn water for your specific situation.
Executing the test: step-by-step water sampling and analysis process
Now that you’ve prepared properly, the actual sampling process requires careful attention to technique. Contamination during collection is the most common reason for inaccurate results, so follow these steps precisely.
-
Choose your sampling location carefully. Select a cold water tap before any treatment systems like filters or water softeners. Kitchen or bathroom faucets work well. Outdoor taps are acceptable if they draw directly from the well without passing through indoor treatment.
-
Remove any aerator or screen from the faucet. These devices harbor bacteria that will contaminate your sample. If the aerator doesn’t unscrew easily, clean it thoroughly with soap and rinse before sampling.
-
Clean the faucet opening. Use soap and water to scrub the exterior and interior of the spout. Rinse thoroughly to remove all soap residue, as soap can affect bacterial testing.
-
Flush the tap. Run cold water at full force for 3 to 5 minutes. This clears water that’s been sitting in pipes and ensures your sample represents water coming directly from the well.
-
Reduce water flow to a steady stream. Too much force can splash and introduce contamination. A moderate flow allows you to fill bottles without splashing.
-
Open the sterile bottle without touching the inside of the cap or bottle opening. Hold the cap with the threaded side facing down to prevent airborne particles from settling on it.
-
Fill the bottle according to lab instructions. Most bacterial tests require leaving a small air space to allow for mixing of preservatives. Chemical tests may need bottles filled completely. Follow your specific lab’s guidance.
-
Cap the bottle immediately and tightly. Label it clearly with your name, address, and collection date and time.
Pro Tip: If you’re testing for bacteria, collect your sample early in the week so it reaches the lab before the weekend. Many labs don’t process bacterial samples on weekends, and delays can invalidate results as bacteria populations change during storage.
Water samples must be taken using sterile bottles from accredited labs, tested for microbiological, chemical, and physical parameters following Livsmedelsverket guidelines. Your comprehensive analysis will examine:
- Microbiological parameters including E.coli, coliform bacteria, and total bacterial count
- Chemical substances such as iron, manganese, nitrate, nitrite, arsenic, lead, and fluoride
- Physical measurements including pH, conductivity, color, turbidity, and temperature
- Optional specialized tests for radon, PFAS, pesticides, or other region-specific concerns
Transport your samples to the lab or shipping point quickly. Keep bacterial samples cool but not frozen during transport. Most labs provide prepaid shipping materials or have drop-off locations throughout Sweden. Confirm your lab’s specific requirements for sample handling and delivery timeframes.
The laboratory analysis typically takes 7 to 14 days depending on the comprehensiveness of your test package. Bacterial results often arrive faster than chemical analysis. Your report will compare each measured parameter against Swedish drinking water standards and EU limits, clearly indicating whether your water meets safety requirements. For a complete understanding of what testing involves for Swedish well owners, explore comprehensive resources on water testing for Swedish well owners.
Interpreting results and next steps if water quality issues arise
Receiving your water test results can feel overwhelming when you’re confronted with dozens of parameters and technical terms. Understanding what the numbers mean and how to respond to problems is crucial for protecting your family’s health.
Common contaminants found in Swedish well water each tell a different story about your water source and required solutions. Bacterial contamination indicates your well has been infiltrated by surface water or animal waste. This represents an immediate health threat requiring action before anyone drinks the water. Elevated iron and manganese cause aesthetic problems like staining and metallic taste but pose minimal health risks at typical concentrations. High nitrate levels point to agricultural runoff or septic system leakage and present serious risks especially for infants. Radon gas occurs naturally in granite bedrock and increases cancer risk with long-term exposure.
Research indicates about 20% of private wells have water unfit for drinking, with 15% showing bacterial contamination. When your results reveal problems, swift action protects your household while you implement solutions.
| Treatment Method | Contaminants Addressed | Installation Complexity | Maintenance Requirements |
|---|---|---|---|
| UV Disinfection | Bacteria, viruses | Moderate | Annual bulb replacement, periodic cleaning |
| Activated Carbon Filter | Chlorine, organic chemicals, taste/odor | Low to Moderate | Filter replacement every 6-12 months |
| Reverse Osmosis | Nitrates, heavy metals, PFAS, dissolved solids | Moderate to High | Membrane replacement every 2-3 years, filter changes |
| Water Softener | Hardness (calcium/magnesium), some metals | Moderate | Salt addition, periodic resin cleaning |
| Chlorination System | Bacteria, some chemicals | Moderate | Regular chlorine addition, system monitoring |
| Radon Aeration | Radon gas | High | Professional installation and maintenance |
Immediate response steps when contamination is detected:
- Stop drinking the water until you’ve implemented treatment or confirmed the problem is resolved
- Use bottled water for drinking and cooking, especially for vulnerable family members
- Investigate the contamination source, looking for septic system problems, surface water intrusion, or well construction defects
- Consult with your municipal environmental health office if bacterial contamination persists
- Consider temporary solutions like boiling water for bacterial issues while planning permanent fixes
Pro Tip: After installing any water treatment system, wait at least two weeks before retesting to allow the system to stabilize and condition. Testing too soon after installation often shows residual problems that the system will eliminate once fully operational.
Long-term well maintenance prevents many contamination issues before they start. Inspect your well cap annually to ensure it’s intact and properly sealed against surface water and insects. Maintain a slope around your wellhead so water drains away rather than pooling near the opening. Keep potential contamination sources like fuel storage, pesticide mixing areas, and septic systems at safe distances from your well. Check private well water statistics to understand common problems in your region and take preventive measures.
When treatment systems are installed, retesting within three to six months confirms they’re working effectively. Don’t assume a new filter or UV system is solving your problem without verification. Treatment systems can fail, and only testing proves your water meets safety standards. Continue your regular testing schedule even after successful remediation, as new problems can develop over time.
For detailed guidance on addressing specific water quality issues, consult resources on well water remediation tips that explain treatment options for different contaminant types.
Ensure safe well water with trusted testing services
Taking responsibility for your well water quality doesn’t mean navigating the process alone. Professional testing services eliminate guesswork and provide the reliable results you need for confident decision making about your family’s health.
Swedish homeowners benefit from choosing accredited laboratory analysis that meets all regulatory standards and provides legally valid documentation. Whether you need basic bacteria water analysis services to screen for immediate health threats or prefer complete water analysis covering dozens of parameters, professional testing delivers clarity about your water safety.
Beyond one-time testing, maintaining ongoing awareness of your water quality through systematic monitoring protects your investment in your property and your family’s wellbeing. Services like well water registration services help you track results over time, identify emerging trends before they become serious problems, and maintain the documentation you’ll need if you ever sell your property. The peace of mind that comes from knowing your water meets safety standards is invaluable, and professional testing makes that confidence affordable and accessible.
FAQ
How often should I test my private well water?
Test at least every 3 years for established wells in stable conditions, but increase frequency to annually if you have children under five, operate a new well, or experience events like flooding or nearby construction. Immediate testing is warranted whenever you notice changes in water appearance, taste, or odor. Swedish authorities recommend more frequent monitoring for vulnerable households to catch problems before they impact health.
What contaminants are tested in a standard well water analysis?
Tests include microbiological contaminants like E.coli, chemical substances such as iron, manganese, nitrate, arsenic, and lead, plus physical measurements like pH, conductivity, and turbidity. Comprehensive packages examine 40+ parameters following Livsmedelsverket guidelines. Specialized tests for radon, PFAS, or pesticides require separate analysis but are crucial in high-risk regions. Your test package should match your well type and regional contamination risks.
What should I do if my well water test shows contamination?
Stop drinking the water immediately and switch to bottled water for consumption and cooking. Use filters and disinfection methods like UV or chlorine, repair well seals if surface water intrusion is suspected, and consult your municipal environmental office for guidance on persistent bacterial problems. After implementing treatment, retest within three to six months to confirm the solution is working effectively. Different contaminants require different treatment approaches, so match your solution to your specific problem.
Can I test my well water myself or do I need a professional?
While you can collect samples yourself following proper sterile technique, the actual analysis must be performed by a Swedac-accredited laboratory to produce legally valid results. Home test kits available at hardware stores lack the precision and credibility needed for health decisions or property transactions. Professional labs test for dozens of parameters simultaneously and provide detailed reports comparing your results against safety standards, which simple home kits cannot match.
How much does well water testing cost in Sweden?
Basic bacterial screening typically costs 800 to 1,200 SEK, while comprehensive analysis packages examining 40+ parameters range from 2,500 to 4,500 SEK depending on the specific tests included. Specialized testing for radon or PFAS adds 1,500 to 3,000 SEK. Though testing represents an expense, it’s far less costly than medical treatment for waterborne illness or property value loss from undisclosed water quality problems. Consider testing an essential maintenance cost like heating system service or roof inspection.